1. Test overview.
This test is used to :
- adjust the 135 gate sharpness at its maximum, in the middle, the top and the bottom of film,
- adjust the coeffG of the 135 gate,
To do these adjustments, the scanner will position a special target film (adapted to this film). Once this target is in front of the CCD, continuous acquisitions will be done to calculate in real time the coeffG, the sharpness in the middle, top and bottom of the film.
By turning the lens (through the nut) and the gate screws, the operator will adjust step by step the coeffG and the sharpness.
If the sharpness is incorrect, the customer could complain that the scanned images are not sharp enough. If the enlargement ratio is incorrect, the customer could complain that too many of the scanned images are cropped or that there are dark edges on the edge of the scanned images.
2. Test conditions.
This test relates to the 135 Film carrier inserted in the scanner.The 135 Film carrier must be inserted in the scanner to carry out this test.
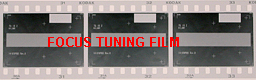
The 135 BW Focus Tuning Film must be used for this test :
No parameter is saved.
3. Pre-requirements.
- The scanner must be equiped with the new adjustable lens mounting. If it is not the case, use the 135 Sharpness CoeffG test.
- Test 135 Pre-Sharp accepted in order to make sur the sharpness pre-adjustment is done.
- For a phase of adjustment from the start, the high and low screws of the film carrier adjusted by default (17,7mm).
4. Test Realisation.
Click on RUN to launch the test. A message will appear asking to enter the theoritical size of the image (written down by hand on the film, about 2200). When it is done, click on OK A message will be displayed requiring the insertion of the 135 BW Focus Tuning film. When the film is inserted (caution watch for the direction of film), click on OK.
The useful part of this film is near the edge of the image, where ther is in the middle, the top and bottom, 5 black lines. These targets will be used to calculate the coeffG and Sharpness values.
The scanner will take the film until the beginning of the film is detected by the CCD. Then the film will progress slowly until the CCD detects the targets.
At this point, the film will not move any more, and the scanner will do continuous acquisitions on this target. Data and curves are the results of these acquisitions :
- In the execution window, display for each acquisition of :
- the middle sharpness value,
- the maximum sharpness value reach in the middle,
- the top sharpness value,
- the bottom sharpness value.
- In the graph window, display for each acquisition of 7 curves :
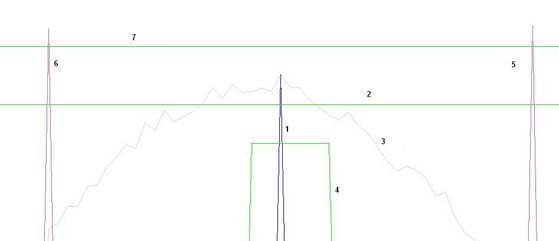
The y-axis of the graph represents the sharpness value.
Each curve will be explained in the adjustment procedure below.
Adjustment procedure :
1. Search for maximum sharpness in the middle of the film.
For this step, focus only on curves 1 and 3.
The curve 1 represents the sharpness value in the middle of the film. The higher this curve is, the more sharpen it is. The lower the curve is, the less sharpen it is. The position of this curve represents the CoeffG, it means that for the given coeffG, there is a given sharpness value. The center of the graph corresponds to the theorical coeffG value, if the CoeffG increases, the sharpness curve 1 will move to the right, if the coeffG decrease, the curve 1 will move to the left.
The first step is used to search for the maximum sharpness value in the middle of the film. To do so, travel through from the theorical coeffG - 30 pixels, to theorical coeffG + 30 pixels (the width of the graph), by turning the lens nut. Don't turn too quickly, or some values will not have time to be calculated, and "blanks" in the curve will be displayed. Each sharpness value for a given coeffG is saved in the curve 3. When the entire coeffG range has been traveled trough, the curve 3 must represent a bell, the top being the maximum sharpness.
2. Adjustment of the acceptable CoeffG.
For this step, focus on curves 1 and 4.
The curve 4 represents the acceptable tolerance for CoeffG. The goal of this step is to position the sharpness curve 1 inside the coeffG tolerance curve 4.
If the curve 1 is inside the acceptable CoeffG, the curve 4 will go green (OK), if not, it will go red (NOK).
3. Adjustment of the couple maximum sharpness / acceptable coeffG.
For this step, focus on curves 1, 2 and 4.
The curve 2 represents the acceptable tolerance for sharpness (94% of the maximum sharpness reached). If the current sharpness (curve 1) is above the curve 2, the sharpness is acceptable (curve 2 goes green : OK), if not, the sharpness is not good enough (curve 2 goes red : NOK).
The goal of this step is to position curve 1 inside curve 4 and above curve 2. In other terms, for the acceptable coeffG, the sharpness must be acceptable. If it the case, the curves 2 and 4 must be green.
4. Adjustment of Top and Bottom sharpness.
For this step, focus on curves 5, 6 and 7.
The curves 5 and 6 represent the sharpness at the bottom (5) and at the top (6) of the film. The horizontal position of these curves is fixed. However, as curve 1, the height of the curve represents the sharpness value (the higher it is, the more sharpen it is).
The curve 7 represents the acceptation criteria of the top and bottom sharpness (same as before : 4% of the highest value). If this curve is gree, it means the top and bottom sharpness are acceptable, if not, the curve is red.
Once the middle sharpness and coeffG have been adjusted, the goal of this step is to adjust the top and / or bottom gate screws, in order to have a top sharpness nearly the same as the bottom sharpness (4% difference accepted). So adjust top or bottom screw in order to increase the lower value.
Please note that this step can modify a little the middle sharpness or coeffG. In this case, do the steps 2 and 3 again.
5. Final acceptation.
If the curves 2, 4 and 7 are green, meaning that the middle sharpness is acceptable, the coeffG is acceptable and the top and bottom sharpness are acceptable, the test can be accepted. Click on Abort, then Accept.
5. Test acceptance.
The test is accepted if the curves 2, 4 and 7 are green, meaning that the middle sharpness is acceptable, the coeffG is acceptable and the top and bottom sharpness are acceptable. If not, the adjustment must go on.
6. Other affected tests.
If the sharpness incorrect, the following tests will be affected :- 135 Cal Encoder 2
- 135 Cal RGB-IR