1. Présentation du test.
This test is used to adjust the barcode lens so that the scanner is able to read Code DX correctly (numbers of exposures).For that, the goal is that the barcode is lighted up on the CCD by the LEDS at one point, so that the software is able to decode the code DX at the correct place.
If the barcode lens is incorrectly adjusted, the reading of Code DX will not work, and the customer could complain about a incorrect recognition of the numbers of exposures of his/her films.
2. Test conditions.
This test relates to the 135 Film carrier inserted in the scanner.The 135 Film carrier must be inserted in the scanner to carry out this test.
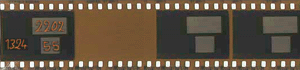
Colour Target Film must be used for this test (ref. 070 100 415A):
No value is saved.
3. Pre-requirements.
- 135 Command Leds Test accepted in order to verify that the LEDS light up the CCD correctly.
- Adjustment tool of the barcode lens , otherwise, a small flat screwdriver.
4. Test realisation.
Cliquer on RUN to carry out the test. A message will come up asking to insert the colour target film. When the film is inserted (caution : Watch for the direction of the film), click on OK.The scanner will pre - scan the film (reading of Code DX at the bottom).
At the end of the pre-scanning, a message will appear requiring to insert the colour target film in the other direction. When the film is inserted (caution : Watch for the direction of the film), click on OK
The scanner will pre-scan the film (reading of Code DX at the top).
A new message will come up containing an image that includes of the Barcode read at the bottom, and of the Barcode read at the top.
The user must indicate the centre position of the Barcode (of the top and of the bottom).

This centre must be inside a window. It is inside this window that the software will make its search for Code DX.
When the position of the Barcode at the top and at the bottom are indicated, click on OK.
The Graph window shows the position of each Barcode, for each position of the lens, as well as high tolerances and low ones.
Notes :
- Once the crosses are known, the position in pixel (from the top and the bottom of the image) is indicated at the top in boxes SIGNAL and BOTTOM
- The right part of the window indicates the history of the positions of the barcode lens (by 1/4 of turn). Show the position in progress to help in the search of the correct position.
- Zoom on the useful part to be precise.
5. Test acceptance.
The test is accepted if the centred position of the Barcode at the top and bottom lies between 32 and 42.If not The test is rejected.
Note : The search window ascertained by this test (32-42) is valid for the DKS in Gate6 version. From the mainline, the search window is much larger, and thus the reading of Code DX will be much more flexible.
6. Other affected tests.
135 Code DX.
7. Trouble shooting.
- If the test fails :
- Turn the barcode lens in either way to improve the result and start again the test until it is accepted.
- Check that the LEDS light up the CCD correctly : 135 Command Leds.
- · If the measurements are unstable : this is due to the fact that the Barcode is read at the very start of the film, when the latter is not yet correctly guided by the belts. The differences in insertion of the film into the film carrier (a little at the top, a little in bottom, a little in skew...) can introduce variations of measurements. It is advisable to introduce the film always in the same way (for example, by pinning it downwards) and to recommend to the Gate6 customer to do it in the same way.