1. Test overview.
This test is used to check if the primary belt is sufficiently tightened. For that, the software measures the current sent to the motor, which reflects the tension on the belt : the more the belt is tightened, the greater the effort needed to turn the motor, the greater the current.The film advance during the scanning must be as regular as possible. In addition the software regulates the current sent to the motor in relation to the efforts needed. Therefore the current must be as steady as possible, however, variations may occur due to the runout of the gears.
The measurement of the belt tension is taken for both directions of rotation of the motor (corresponding to the pre-scanning and actual scanning).
If the belt is not sufficiently tightened, the film could slip during the scanning and this could lead to a faulty framing of the images. On the other hand, if the belt is too tight, the risk of overtorque (overloaded motor) will be too great.
2. Test conditions.
This test relates to only the scanner.No film carrier must be present in the scanner to carry out this test.
No film is necessary for this test.
The acceptance of the test is automatic.
No parameter is saved.
3. Pre-requirements.
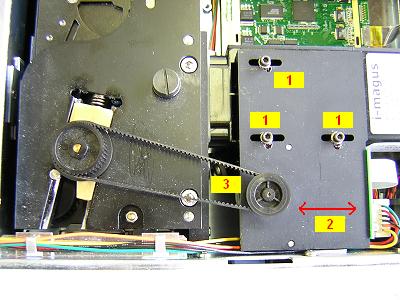
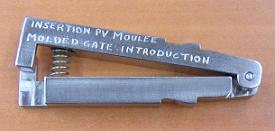
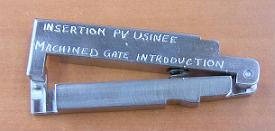
Before proceeding with this test, it is necessary to mechanically tighten the belt. That is normally done with a adequate tool, but it can also be done by hand.- If the tool is available : Loosen up the 3 screws (1) of the motor plate so that it's free (2). Place the tool between the belt free (3) (on the side of the driving gear). Allow the spring to act then retighten the 3 screws (1). Withdraw the tool.
- · If the tool is not available : loosen the 3 screws (1) of the motor plate so that it 's free (2). pull on the motor plate until the tension on the belt is deemed sufficient. Retighten the 3 screws (1) and proceed with test. According to the result, slacken or tighten the belt.

Moulded version tool |
Machined version tool |
 |
 |
4. Test realisation.
Click on RUN to execute the test. The motor will turn during 15 seconds in one direction then 15 seconds in the other (these 15 seconds correspond to one revolution of the film carrier belts.At the end of the test, in the result box, a red curve and one blue curve will be displayed (corresponding to both directions of rotation of the test). In the execution window, the quantified results of each curve will be displayed. The test will automatically be accepted or rejected according to the results of these 2 curves.
5. Test acceptance.
The software is used mainly for 3 criteria (for each direction of rotation, that is to say 6 in total) in order to accept or reject the test :- the average of the curve: must lie between 74 and 83,7.
- the maximum of the curve: must be lower than (real average + 15,5%).
- minimum of the curve: must be higher than (real average - 15,5%).
6. Other affected tests.
If the tension of the primary belt is modified in significant proportions, the following tests should be redone.- xxx motor intensity.
- xxx cal play.
- 135 Cal H-offset.
- xxx cal encoder 2.
- xxx cal RGB IR.
Of course, if the tension of the belt has only been slightly modified (for example, the average passed from 82 to 73), it is probably not useful to redo all these tests.